
Root A Galaxy Note 4 SM-N910V And Install TWRP Recovery On It
In this guide, we’re going to show you how you can root a Galaxy Note 4 and install TWRP recovery on it using Odin. We will flash the recovery and at the same time we will be flashing Super SU and this will root your device.
Mura foonu rẹ:
- This guide is only for use with the Samsung Verizon Galaxy Note 4. Using it with another device could brick it. Check your device model number by going to Settings>More/General>About Device or else try Settings>About Device.
- Gba agbara si batiri rẹ si o kere 60 ogorun. Eyi ni lati rii daju pe ẹrọ rẹ ko padanu agbara ṣaaju ṣiṣe naa ti pari.
- Ṣe okun USB ti o OEM ti o le lo lati fi idi asopọ kan mulẹ laarin foonu rẹ ati PC kan.
- Pada sipo o pe awọn àkọọlẹ, awọn olubasọrọ ati awọn ifiranṣẹ SMS pataki
- Ṣe afẹyinti awọn faili media pataki nipasẹ didakọ wọn si PC tabi kọǹpútà alágbèéká kan.
- Have a Back up EFS made.
- If your device is rooted, use Titanium Backup to backup apps, system data and any other important content.
- If you had CWM or TWRP previously installed, create a Backup Nandroid.
Akiyesi: Awọn ọna ti o nilo lati filasi aṣa awọn aṣa pada, roms ati lati gbongbo foonu rẹ le ja si ni bricking ẹrọ rẹ. Rutini ẹrọ rẹ yoo tun sẹ atilẹyin ọja ati pe yoo ko ni yẹ fun awọn iṣẹ ẹrọ ọfẹ lati ọdọ awọn olupese tabi awọn olupese atilẹyin ọja. Jẹ ẹri ki o si pa wọn mọ ni iranti ṣaaju ki o to pinnu lati tẹsiwaju lori iṣẹ rẹ. Ni irú ti mishap kan waye, a tabi awọn olupese ọja naa ko yẹ ki o waye ni idiyele.
download:
- Odin3 v3.10.
- Awọn awakọ USB USB USB
Install TWRP Recovery On Verizon Note 4
- Ṣii Odin
- Put your phone into download mode by first turning if off and waiting for 10 seconds. Then, turn your phone back on by pressing and holding the volume down, home, and power buttons at the same time. When you see a warning, press volume up,
- Connect your phone to a PC. Make sure that you’ve already installed the Samsung USB drivers.
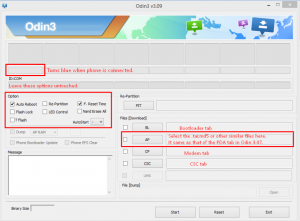
- When your phone is detected by Odin, you should see the ID:COM box turn blue.
- If you have an Odin 3.09, choose the AP tab. If you have an Oding 3.07, choose the PDA tab.
- From either the AP or PDA tab, choose the .tar.md5 or .tar file that you downloaded, leave the rest of the options untouched.
- Ensure that the options selected in your Odin match the photo below.
- Hit start and flashing will begin. Wait for it to complete.
- When complete, you device should restart, remove it then from the PC.
Root Your Device:
- Connect device with PC.
- Copy and past the downloaded zip files to your sdcard’s root.
- Ge asopọ okun naa.
- Pa ẹrọ rẹ kuro
- Open the device into recovery mode by pressing and holding down the volume up, home and power buttons till text appears on screen.
Awọn olumulo TWRP.
- tẹ ni kia kia Afẹyintiki o si Yan Eto ati Data
- Ra awọnAjẹrisi ijẹrisi
- tẹ ni kia kia Pa Aami Bọtiniati ki o yan
- Ra Ifaworanhan ijẹrisi.
- Pada si Ifilelẹ Akojọ aṣynati Fọwọ ba Fi Bọtini sii.
- Wa oun Imudojuiwọn-SuperSU-v1.94.zipati Rii igbasẹ naa To install .
- When Installation is Over, you will see the prompt: Tun ero tan nisin yii
- yan atunberebayi and your device should reboot.
- Lo aGbongbo Checker app or go to your App drawer and check that Super SU app is there to confirm that you have rooted your device.
Have you installed a TWRP Recovery and rooted your device?
Pin iriri rẹ ni apoti idahun ti o wa ni isalẹ.
JR
[embedyt] https://www.youtube.com/watch?v=k2oOvf5tOCY[/embedyt]


Tengo una note la n910v y he intentado hacer root de todas las formas por odio por add en odin me da fail je intentando con varios de esta variente pero no he podido
Siga cuidadosamente las instrucciones paso a paso en la guía detallada anteriormente.
Deberia de funcionar.